In this blog post I will show you how to use the calibration UI and how to obtain smooth disparity maps.
The original blogpost was created on Sept 2021 and migrated to the new website, thus the code may need to be revised.

This blog post is part of a 3 part series on detecting depth using a PS4 camera:
- Episode 1 - PS4 Camera on Windows
- Episode 2 - Camera Calibration
- Episode 3 - Depth Estimation
Throughout the rest of the tutorial, you will gain experience in using OpenCV and Python to handle image streams and combine stereo images to obtain depth information.
👉 Get the latest version of the code here
What is disparity
Disparity can be defined as the difference in image location of an object seen by the left and right eyes (source).
In order to calculate disparity we need to:
- capture a left_frame and a right_frame at the same moment in time
- and then rectify the frames such that we can determine the pixel correspondence between frames (where the same pixel is placed in two different images)
In the first tutorial we captured the feed from a PS4 camera and captured images for both objectives at each timestamp. These images we called the right_frame and the left_frame (similar with images created by our left and right eyes).
In the second tutorial we rectified the images to be able to trace an object from the left frame and the right frame and make sure that it had the same positioning relative to the green lines. If objects have the same distance relative to the green lines, it means that today’s algorithm will also be able to trace the pixels.
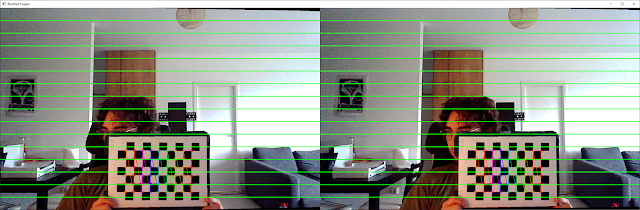
Fun fact: These lines are actually called epipolar lines and are horizontal lines which coincide with the rows of the image.
From disparity we can then calculate depth by:
- looking up the disparity for the corresponding pixels: (x’, y’) = (x + disparity, y);
- apply to (x, y) and (x’, y’) the inverse of the rectification homographies H and H’, obtaining (u, v) and (u’, v’) in the original image coordinates;
- backproject these pixels and intersect the rays. The ray intersection point will give the distance to the object in space.
If you want to learn more about disparity you can check out the references at the end of the blogpost.
Prerequisites
Warning
This tutorial uses my custom PS4DataSource class for visualizations. In order to use it on a non PS4 camera, you may have to create derive the PS4DataSource class.
With that in mind, you can still use the calibration script to adjust your depth maps.
The dependencies for the calibration script are stored in the requirements.txt file and I recommend you install them in a virtual environment.
# Clone the repository locally
git clone https://github.com/2BytesGoat/ps4-camera
cd ps4-camera

# Create a virtual environment for the project
python3 -m pip install virtualenv
python3 -m venv .env

# Activate the environment and install the dependencies
.env/Scripts/activate
pip install -r requirements.txt
Calibration script
I’ve tried to design the calibration UI as modular as possible. In case you would like to experiment with different depth algorithms, you can adapt the configuration files from src/calibration/configs (you have there two examples for BM and SGBM algorithms).
To open the UI you will have to have to be within the virtual environment and run the following command
# opening the virtual environment (on Windows)
.env/Scripts/activate

# opening the calibration UI
python 03_depth_calibration.py
By default, the UI will calibrate for the BM algorithm, but if you want to calibrate for SGBM, you will have to update line 28 from 03_depth_calibration.py
# from this
depth_calibrator = DepthCalibrationUI(frame_r, frame_l, 'bm', smoothen_depth=True)

# to this
depth_calibrator = DepthCalibrationUI(frame_r, frame_l, 'sgbm', smoothen_depth=True)
There are a lot of sliders to play with and you can spend hours trying to figure out which are the best combinations. For starters, I’ve created default values from which you can start iterating, but I believe you will have to play most of the time only with “NumOfDisp” and “MinDISP”.
When you’ll press “Save settings” you will override the checkpoint and “Load settings” will only use the latest checkpoint.
Also, pressing “Save settings” will create a more concise checkpoint which will be placed at src/data_source/calibration_params and will be used by the disparity algorithm class (located at src/depth/stereo_depth.py).
Switching between depth algorithms
If you got so far Hurray! 🎉 Give yourself a pat on the back, you deserve it!
Now, if you want to check how the depth estimation works, I setup a small demo script that you can use by running
# running the entire pipeline
python 01_start_camera.py
Again, a bit brute-force but if you want to change the algorithm which is used you can go and comment line 9 and uncomment line 10 in 01_start_camera.py
# if you want to use bm
depth_algo = get_stereo_depth_algo('bm', smoothen=True)
# depth_algo = get_stereo_depth_algo('sgbm', smoothen=True)

# if you want to use sgbm
# depth_algo = get_stereo_depth_algo('bm', smoothen=True)
depth_algo = get_stereo_depth_algo('sgbm', smoothen=True)
Here are a some visual comparisons between the two algorithms

BM algorithm - fast but noisy

SGBM algorithm - slower but less bleeding
Summary
In today’s post we looked over:
- Why we need to calibrate stereo cameras
- What is disparity and how we can use it to calculate depth of objects
- How to setup and use the script for depth calibration
This concludes the series of tutorials for how you can visualize depth of objects in an image using a stereo (PS4) camera.
If you have any questions leave them in the comments and I’ll try to answer them as soon as I can.
Hope you enjoyed the blog post :)
Peace 🐐
References
OpneCV forum - Smoothing BM/SGBM outputs
Thomas Rimer - OpenCV Disparity Mapping // 2020 Quest
Rich Radke - CVFX Lecture 15: Stereo correspondence
Chee Kin Chan and Hassan Munir - Comparison of stereovision algorithms