In this blog post I will explain how you can setup a PlayStation4 camera on a Windows machine and how to capture images from it for your personal projects.
The original blogpost was created on Sept 2021 and migrated to the new website, thus the code may need to be revised.

This blog post is part of a 3 part series on detecting depth using a PS4 camera:
- Episode 1 - PS4 Camera on Windows
- Episode 2 - Camera Calibration
- Episode 3 - Depth Estimation
Throughout the rest of the tutorial, you will gain experience in using OpenCV and Python to handle image streams, combine stereo images to obtain depth information, running Pose Estimation models to extract skeletons from frames and how to transform 2D skeletons into 3D skeletons for animations.
Setting up the camera
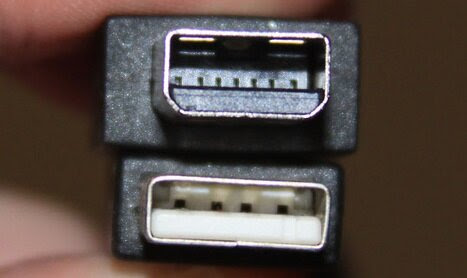
The PS4 connector is just a regular USB3 port with with a slightly modified shape
The PS4 camera has the infamous proprietary connector which made you unable to plug the camera in regular USB ports. Due to this lot of people started creating third party adapters or even soldering and rewiring the lines. But since somebody forgot to add the proprietary connector to PS5 version, there is still hope to get one for FREE.
This leads us to…
Obtaining a camera adaptor
If you have a PlayStation VR, Sony has created a program in which they ship you a free adapter via mail (that’s how I got mine).
Otherwise you will need to find a way to acquire or create an adapter for your camera (see the links above for third party adapters and soldering).
Connecting the camera to your PC
Neither Windows or Linux support the PS4 camera out of the box (and why would they since you should not be able to connect it to your PC) which means that we have to load our own firmware to be able to read camera feed.
There are two types of drivers you can use:
Connect your PS4 camera to your adaptor and plug the adaptor into a USB3 slot (it won’t work on USB2) then you will have to install the drivers.
 After setting up you should be able to open the Windows Camera app and have a video stream.
Loading camera firmware from code
If you went through all the previous steps and successfully saw yourself in the Windows Camera app it means that you should be able to follow up with the next steps.
However, if at some point you want to remove the PS4 camera from your PC you will have to reload the firmware by running FirmwareLoader every time, which may seem tedious.
To ease our work, you can use the code below to load the firmware from code and not think about whether you ran the script yourself or not.
First we have to identify the index of our camera. If you have only one camera connected, then the index should be 0, otherwise the index is given by the order in which you plugged in the cameras in your PC.
# open camera stream using OpenCV
cap = cv2.VideoCapture(camera_index)
Then we need to read the frames as a continuous stream and display the output.
while True:
    # capture frame-by-frame
    ret, frame = cap.read()
    # show frames until the 'q' key is pressed
    cv2.imshow('original', frame)
cv2.destroyAllWindows()
Just adding a few conditions to exit the while loop and the final code should look something like this
# open camera stream using OpenCV
cap = cv2.VideoCapture(camera_index)
while True:
    # capture frame-by-frame
    ret, frame = cap.read()
    # if frame is read correctly ret is True
    if not ret:
    print("Can't receive frame. Exiting ...")
    break
    # show frames until the 'q' key is pressed
    cv2.imshow('original', frame)

    if cv2.waitKey(1) == ord('q'):
        break
cv2.destroyAllWindows()
Now we just have to fix image quality and infinite frames
Video stream not working
For some reason you will have to run the Windows Camera app the first time you plug in the camera in your PC. In that case you can either solve the issue by launching the app manually, or by calling the following function in your code.
def _adapt_brightness_using_windows():
    # Using windows camera predefined camera init functionality
    # Warining! There will be exposure difference between times of day
    subprocess.run('start microsoft.windows.camera:', shell=True)
    time.sleep(4)
    # wait for camera brightness to calibrate
    subprocess.run('Taskkill /IMWindowsCamera.exe /F', shell=True)
    time.sleep(1)
Fixing camera quality
I’ve played a bit with some values and saw that the numbers which fit best the resolution of the camera are 3448 pixels for width and 808 pixels for the height. Now you will have to add the following lines after you open the camera stream and your image quality should drastically improve.
FRAME_INFO = {
    cv2.CAP_PROP_FRAME_WIDTH: 3448,
    cv2.CAP_PROP_FRAME_HEIGHT: 808
}
# open camera stream using OpenCV
cap = cv2.VideoCapture(camera_index)
# set actual frame width and height
for key, value in FRAME_INFO.items():
    cap.set(key,value)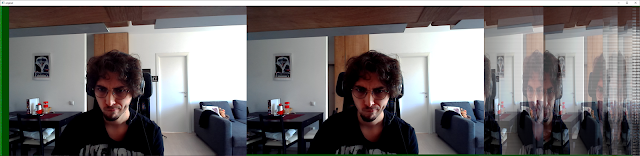
We still have to fix the infinite frame loop
Fixing camera infinite frame loop
It seems like we only need the first two images from the frame to make due, and also get rid of that ugly greed bar from the left. Again, I played a bit with the numbers, and it seems that after shifting 64 pixels to the right we can then extract two frames of 1264 by 800 pixels using the code below.
def _extract_stereo(frame, x_shift=64, y_shift=0,
                    width=1264, height=800, frame_shape=None):
    frame_r = frame[y_shift : y_shift+height,
    x_shift : x_shift+width]
    frame_l = frame[y_shift : y_shift+height,
                    x_shift+width : x_shift + width*2]
    if frame_shape:
        frame_r = cv2.resize(frame_r, frame_shape)
        frame_l = cv2.resize(frame_l, frame_shape)
    return frame_r, frame_l
Not too shabby if I do say so myself
Summary
In today’s post we looked over how we can:
- Connect our PS4 camera to a Windows PC
- Load camera firmware using Python’s subprocess class
- Increase camera quality by setting VideoCapture parameters
- Separate stereo frame into two frames corresponding to the left and right camera
This will help us a lot when developing the algorithm for depth calculation and further on when we will develop the algorithm for extracting 3D skeletons.
If you have any questions leave them in the comments and I’ll try to answer them as soon as I can.
Hope you enjoyed the blog post :)
Peace 🐐